Python3—笔记

部分内容来自知乎和中国大学mooc

[toc]

1. Python概述

1.1 代码编写方式:

  • 交互式
  • 全部编辑好后运行

1.2 作用域

  • 默认使用 ‘缩进’ 来区分代码 属于哪部分

1.3 注释

  • 单行 # 注释内容
  • 多行 ''’ 注释内容''’
1
2
3
4
5
# 这是单行注释

'''
这是多行注释,实际上是一个字符串
'''

1.4 输入——input()

1
2
3
4
5
6
7
8
9
10
11
12
13
# 括号内为提示信息,输入的信息存储在变量 name 中
#注意:input()输入的实际上是字符串,若要输入数字进行运算,可以使用强制转换
name = input('请输入你的姓名')

# 强制转换:
#第1种方法(适用于所有类型):
age = input('输入年龄')
newAge = int(age)+1


#第2种方法(适用于数值类型,eval()实际上是将字符串强行作为数字使用,相当于去掉引号):
age = input('输入年龄')
newAge = eval(age)+1

1.5 输出——print()

1
2
3
4
5
6
7
8
9
10
#单个字符串
print("hello world")


#多个字符串,print()会依次打印每个字符串,遇到逗号“,”会输出一个空格
print('The quick brown fox', 'jumps over', 'the lazy dog')


#输出 计算结果
print(100 + 200)

1.6 数据类型

注意: 整数浮点数 在计算机内部存储的方式是不同的,整数 运算永远是精确的(除法也是精确的),而浮点数 运算则可能会有四舍五入的误差。

1.6.1 int

1
2
3
4
5
6
#十进制
123,-123200
#十六进制 用0x前缀和0-9,a-f表示
0xff000xa5b4c3d2

#对于很大的数,例如10000000000,很难数清楚0的个数。Python允许在数字中间以_分隔,因此,写成10_000_000_000和10000000000是完全一样的。十六进制数也可以写成0xa1b2_c3d4

1.6.2 float

1
2
3
4
#对于很大或很小的浮点数,就必须用科学计数法表示,把10用e替代,
1.23x10^9 就是 1.23e9

12.3e80.000012 可以写成 1.2e-5

1.6.3 str

1
2
3
4
5
6
7
8
9
10
11
12
13
14
#使用单引号或者双引号包裹
'你好'
"你好"
# 如果字符串内需要有单引号:外面用双引号
" I'm a boy "
# 如果字符串内需要有双引号:外面用单引号
' I am a "boy" '
# 如果字符串内需要有 单引号和双引号 :使用转移字符\
' I\'m \"OK\"! ' 表示 I'm "OK"!

#如果字符串很长,需要换行:使用三引号
print('''line1
line2
line3''')

1.6.4 bool

1
2
3
4
5
6
7
8
9
#布尔值只有True、False两种值,布尔值可以用and、or和not运算
>>> True and True
True
>>> True and False
False
>>> False and False
False
>>> 5 > 3 and 3 > 1
True

1.6.5 None 空值

1.6.6 list (有序列表)

1
2
3
4
5
6
7
8
9
10
11
12
13
14
15
16
17
18
19
20
21
22
23
24
25
26
27
28
29
30
31
32
33
34
35
36
37
38
39
40
41
42
43
44
45
46
47
48
49
50
51
52
53
54
55
56
57
58
59
60
'''
list有以下几个特点:
查找和插入的时间随着元素的增加而增加;
占用空间小,浪费内存很少。

'''


# list的格式(list中的元素的 数据类型 可以不同,甚至可以是1个list)
>>> classmates = ['Michael', 'Bob', 'Tracy']
>>> classmates
['Michael', 'Bob', 'Tracy']


# 使用len() 获取list长度
>>> len(classmates)
3


# 使用index 访问list中的元素(index的范围为:0 ~ len-1 ),当索引超出了范围时,Python会报一个IndexError错误
>>> classmates[0]
'Michael'

# list 的最后一个元素的两种表示方法
>>> classmates[len(classmates) - 1]
>>> classmates[-1]

############## 插入相关的方法 ########################

# 向list的末尾追加1个元素 append()
>>> classmates.append('Adam')
>>> classmates
['Michael', 'Bob', 'Tracy', 'Adam']


# 在指定位置前 插入1个元素
>>> classmates.insert(1, 'Jack')
>>> classmates
['Michael', 'Jack', 'Bob', 'Tracy', 'Adam']


############## 删除相关的方法 ########################

# 删除 最后1个元素
>>> classmates.pop()
'Adam'


# 删除 指定元素
>>> classmates.pop(1)
'Jack'
>>> classmates
['Michael', 'Bob', 'Tracy']


############## 替换相关的方法 ########################

>>> classmates[1] = 'Sarah'
>>> classmates
['Michael', 'Sarah', 'Tracy']

1.6.7 tuple (元组)

一种内部元素不可更改的list , 相较于 list 更安全

1
2
3
4
5
6
7
8
9
10
11
12
13
############# tuple 的定义 ###############

>>> t = (1, 2)
>>> t
(1, 2)


# 定义一个只有1个元素的tuple,
# 后面加逗号是为了避免被直接当成内部元素

>>> t = (1,)
>>> t
(1,)

1.6.8 dict (字典)

字典: 内部为键值对,键 在该字典中必须唯一 ,字典是无序的

1
2
3
4
5
6
7
8
9
10
11
12
13
14
15
16
17
18
19
20
21
22
23
24
25
26
27
28
29
30
31
32
'''
dict有以下几个特点:

查找和插入的速度极快,不会随着key的增加而变慢;
需要占用大量的内存,内存浪费多。
key 不可变,因为用key查找value时,必须依靠key进行 hash运算

'''

############## dict的定义 ###############
>>> d = {'Michael': 95, 'Bob': 75, 'Tracy': 85}
>>> d['Michael']
95


# 放入元素
>>> d['Adam'] = 67
>>> d['Adam']
67


# 获取元素方法 get(键,当键不存在时的返回值【默认为None】)
>>> d.get('Thomas')
None
>>> d.get('Thomas', -1)
-1

# 删除某个键时,该键的值也会删除
>>> d.pop('Bob')
75
>>> d
{'Michael': 95, 'Tracy': 85}

1.6.9 set (集合)

集合类型 : 要创建一个set,需要提供一个list作为输入集合, set是无序的, 重复元素在set中自动被过滤 ,与dict一样内部元素不可变

1
2
3
4
5
6
7
8
9
10
11
12
13
14
15
16
17
18
19
20
21
22
23
24
25
26
27
28
29
30
31
32
33
34
35
36
37
38
39
40

>>> s = set([1, 2, 3])
>>> s
{1, 2, 3}


>>> s = set([1, 1, 2, 2, 3, 3])
>>> s
{1, 2, 3}

############ 添加 set的元素 ########

# 添加set的元素 add( )
>>> s.add(4)
>>> s
{1, 2, 3, 4}

>>> s.add(4)
>>> s
{1, 2, 3, 4}


# 删除元素 remove( )
>>> s.remove(4)
>>> s
{1, 2, 3}


########### 集合set 之间的运算 ###########

>>> s1 = set([1, 2, 3])
>>> s2 = set([2, 3, 4])

# 并集
>>> s1 & s2
{2, 3}

#交集
>>> s1 | s2
{1, 2, 3, 4}

1.7 运算符

1
2
3
4
5
6
7
8
9
10
11
12
13
14
15
16
17
18
19
# +
a = 1+2

# -
a= 3-1

# *
a= 3*2

# / 除法结果一定是小数
a= 2/3 # 0.66666666
b= 6/2

# // 整除
a= 6//5 # 1


# % 取余数
a = 7 % 5 # 2

1.8 条件判断

1
2
3
4
5
6
7
8
9
10
11
12
13
14
15
16
17
18
19
'''
if语句执行有个特点,它是从上往下判断,如果在某个判断上是True,把该判断对应的语句执行后,就忽略掉剩下的elif和else
'''


# 格式
age = 3
if age >= 18:
print('adult')
elif age >= 6:
print('teenager')
else:
print('kid')


# 简写,其中 x 只要为 非零数值、非空字符串、非空list等,就判断为True,否则为False
if x:
print('True')

1.9 循环

1
2
3
4
5
6
7
8
9
10
11
12
13
14
15
16
17
18
19
20
21
22
23
24
25
26
27
28
29
30
31
32
33
34
35
36
37
38
39
40
41
42
43
44
45
46
47
#################  for 循环 ######################


# for...in 循环
names = ['Michael', 'Bob', 'Tracy']
for name in names:
print(name)


# range(a,b)函数 的范围是[a,b)
# 例如:结果=5050 即:0-100
sum = 0
for x in range(101):
sum = sum + x
print(sum)


################# while循环 ########################

# 在循环内部变量n不断自减,直到变为-1时,不再满足while条件,循环退出
sum = 0
n = 99
while n > 0:
sum = sum + n
n = n - 2
print(sum)


#################### break关键字 ####################
n = 1
while n <= 100:
if n > 10: # 当n = 11时,条件满足,执行break语句
break # break语句会结束循环
print(n)
n = n + 1
print('END')


#################### continue关键字 ####################
n = 0
while n < 10:
n = n + 1
if n % 2 == 0: # 如果n是偶数,执行continue语句
continue # continue语句会直接继续下一轮循环,后续的print()语句不会执行
print(n)

1.10 编码: Unicode ,ASCII ,UTF-8

  • ASCII编码和Unicode编码的区别:
    1. ASCII编码1个字节,而 Unicode编码 通常是2个字节
    2. 文本上全部英文时,Unicode 编码ASCII 编码 需要多一倍的存储空间,在存储和传输上就十分不划算。
    3. Unicode编码转化为“可变长编码”的 UTF-8编码UTF-8编码把一个Unicode字符根据不同的数字大小编码成1-6个字节,常用的英文字母被编码成1个字节汉字通常是3个字节,只有很生僻的字符才会被编码成4-6个字节
    4. 传输的文本包含大量英文字符时,用 UTF-8编码 更节省空间 。

1.11 函数

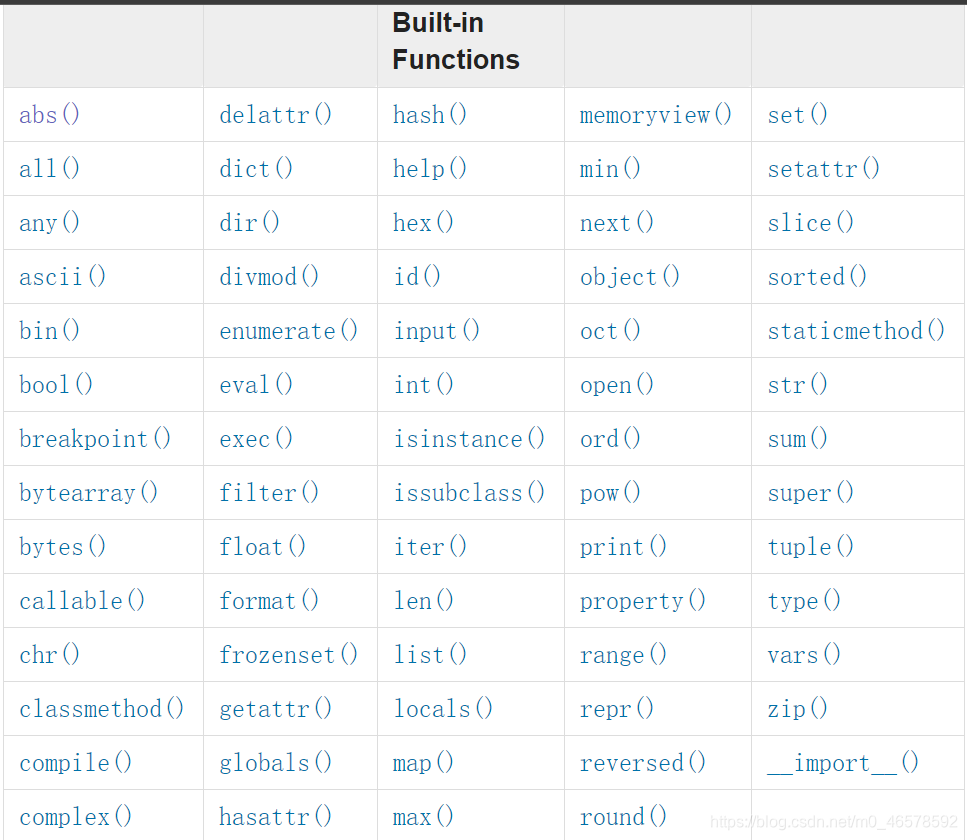
1.11.1 内置函数 速查表

官网: https://docs.python.org/3/library/functions.html
内置函数表

1.11.2 自定义函数

1
2
3
4
5
6
7
8
9
10
11
12
13
14
15
16
17
18
19
20
21
22
23
24
25
26
27
28
29
30
31
32
33
34
35
36
37
38
39
40
41
42
43
44
45
46
47
48
'''
调用函数的时候,如果传入的参数数量不对,会报`TypeError`的错误
数据类型检查可以用内置函数isinstance()实现
'''


###################### 自定义 函数 ######################

#如果没有return语句,函数执行完毕后也会返回结果,只是结果为None。return None可以简写为return
def my_abs(x):
if x >= 0:
return x
else:
return -x


#定义一个什么事也不做的空函数,使用pass 来充当占位符
def nop():
pass


# 数据类型检查可以用内置函数isinstance()实现
# isinstance(参数1,参数2) 如果参数1(object)的类型 与 参数二的类型(classinfo)相同则返回 True,否则返回 False
def my_abs(x):
if not isinstance(x, (int, float)):
raise TypeError('bad operand type')
if x >= 0:
return x
else:
return -x


# 返回多个值的函数(实际上返回的是1个 tuple)
import math

def move(x, y, step, angle=0): #实际上 move( )返回的是1个 tuple
nx = x + step * math.cos(angle)
ny = y - step * math.sin(angle)
return nx, ny

>>> x, y = move(100, 100, 60, math.pi / 6)
>>> print(x, y)
151.96152422706632 70.0

1.11.3 函数参数

  1. 默认参数:

    默认参数必须指向 不可变的对象【如: str , tuple等】
    如果默认参数为一个 list,则每次调用会记住上次调用的操作,造成结果不对

1
2
3
4
5
6
7
8
9
10
11
12
############### 默认参数 ###############

# 例如 以下的 n=2 就是默认参数
# 当我们调用power(5)时,相当于调用power(5, 2)
# 而对于n > 2的其他情况,就必须明确地传入n,比如power(5, 3)

def power(x, n=2):
s = 1
while n > 0:
n = n - 1
s = s * x
return s
  1. 可变参数(即:参数前加*):

    允许传入0个或任意个参数,这些可变参数在函数调用时自动组装为一个tuple

1
2
3
4
5
6
7
8
9
10
11
12
13
14
15
############### 可变参数 ###############

# 在函数内部,参数numbers接收到的是一个tuple,
# 因此,函数代码完全不变。但是,调用该函数时,可以传入任意个参数,
# 包括0个参数,即:在普通的参数前加上*
def calc(*numbers):
sum = 0
for n in numbers:
sum = sum + n * n
return sum

>>> calc(1, 2)
5
>>> calc()
0
  1. 关键字参数(即:参数前加2个星号*):

    允许你传入0个或任意个含参数名的参数,这些关键字参数在函数内部自动组装为一个dict

1
2
3
4
5
6
7
8
9
10
11
12
13
14
15
16
17
############### 关键字参数 ###############

# 关键字参数 允许你传入0个或任意个含参数名的参数,
# 这些关键字参数在函数内部自动组装为一个dict

def person(name, age, **kw):
print('name:', name, 'age:', age, 'other:', kw)


# 只传入必选参数时
>>> person('Michael', 30)
name: Michael age: 30 other: {}


# 传入任意个数的关键字参数时
>>> person('Adam', 45, gender='M', job='Engineer')
name: Adam age: 45 other: {'gender': 'M', 'job': 'Engineer'}
  1. 命名关键字参数:

    限制关键字参数的名字,命名关键字参数需要一个特殊的分隔符*,后面的参数被视为命名关键字参数,如果函数定义中已经有了一个可变参数,后面跟着的命名关键字参数就不再需要一个特殊分隔符*了。命名关键字参数必须传入参数名

1
2
3
4
5
6
7
8
9
10
11
12
13
14
15
#########  命名关键字参数  ################

# 命名关键字参数:限制关键字参数的名字
#命名关键字参数需要一个特殊分隔符*,*后面的参数被视为命名关键字参数

def person(name, age, *, city, job):
print(name, age, city, job)

# 如果函数定义中已经有了一个可变参数,
# 后面跟着的命名关键字参数就不再需要一个特殊分隔符*了
def person(name, age, *args, city, job):
print(name, age, args, city, job)

#命名关键字参数 (调用时)必须连同 参数名 一起传入【有默认值时除外】
person('Jack', 24, city='Beijing', job='Engineer')

2. Python 自动化办公

2.1 Excel 速查表

excel速查表

3. Python 爬虫(基本)

3.1 常用的爬虫库

在这里插入图片描述

3.2 requests 库

在这里插入图片描述

1
2
3
4
5
6
7
8
9
10
11
12
import requests
url='http://item.jd.com/2967929.html'

data={
'kw':"张三"
}

myProxy={
'http':'123.123.123.123:2345'
}

requests.get(url=url,params=data,proxies=myProxy)

3.2.1 案例1 京东商品详情页

1
2
3
4
5
6
7
8
9
10
11
12
13
14
15
16
#实例1:爬取京东商品详情页
import requests
url='http://item.jd.com/2967929.html'
try:
r=requests.get(url)

#检查Response状态码,若不是200则产生HttpError异常
r.raise_for_status()

# 将编码设 utf-8
r.encoding=r.apparent_encoding

# 截取页面前1000行
print(r.text[:1000])
except:
print("爬取失败")

3.2.2 案例2 亚马逊商品详情页

1
2
3
4
5
6
7
8
9
10
11
12
13
14
15
16
17
18
19
20
21
22
23
24
#实例2:爬取亚马逊商品详情页————协议头
url='https://www.amazon.cn/dp/B076YGLN6G?smid=A3CQWPW49OI3BQ&ref_=Oct_CBBBCard_dsk_asin2&pf_rd_r=X83064H6KVVDTZ4WWDFB&pf_rd_p=5a0738df-7719-4914-81ee-278221dce082&pf_rd_m=A1AJ19PSB66TGU&pf_rd_s=desktop-3'
try:
res = requests.get(url)
res.raise_for_status() #503
res.encoding=r.apparent_encoding #'ISO-8859-1'
print(res.text[:1000])
except:
print("爬取错误")

'''
res.request.headers
输出:
{'User-Agent': 'python-requests/2.22.0', 'Accept-Encoding': 'gzip, deflate', 'Accept': '*/*', 'Connection': 'keep-alive'}
'''

try:
kv={'user-agent':'Mozilla/5.0'} #浏览器身份标识的字段
r=requests.get(url,headers=kv)
r.raise_for_status() #r.status_code 200
r.encoding=r.apparent_encoding
print(r.text[1000:3000])
except:
print("爬取失败")

3.2.3 案例3 百度/360搜索关键字

1
2
3
4
5
6
7
8
9
10
11
12
13
14
15
16
17
18
19
20
21
22
#实例3:爬取搜索页面
import requests
try:
kw={'wd':'python'}
r=requests.get('https://www.baidu.com/s',params=kw)
r.raise_for_status()
r.encoding=r.apparent_encoding
print(len(r.text))
#r.request.url 返回的是百度安全验证的链接?
except:
print("爬取失败")


import requests
try:
kw={'q':'python'} #360搜索的关键字的键为q
r=requests.get('https://www.so.com/s',params=kw)
r.raise_for_status()
r.encoding=r.apparent_encoding
print(len(r.text)) #257468
except:
print("爬取失败")

3.2.4 案例4 网络图片爬取及存储

1
2
3
4
5
6
7
8
9
10
11
12
13
14
15
16
17
18
19
20
21
22
#实例4:爬取图片
'''r.content #表示返回内容的二进制格式'''
import requests
import os
root='./Pic/'
path=root+url.split('/')[-1].split('@')[0]
url='http://img0.dili360.com/ga/M00/02/AB/wKgBzFQ26i2AWujSAA_-xvEYLbU441.jpg@!rw9'
try:
if not os.path.exists(root):
os.mkdir(root) #创建根目录
if not os.path.exists(path):

r=requests.get(url)
# 如何将二进制转化为图片保存
with open(path, 'wb') as f:
f.write(r.content)
f.close()
print('图片保存成功')
else:
print('文件已存在')
except:
print("爬取失败")

3.2.5 案例5 IP地址归属地查询

1
2
3
4
5
6
7
8
9
10
#实例5:IP地址归属地查询
import requests
url='http://www.ip138.com/iplookup.asp?ip='
try:
r=requests.get(url+'183.216.163.144',headers=kv)
r.raise_for_status()
r.encoding=r.apparent_encoding
print(r.text[:-500])
except:
print('爬取失败')

3.3 urllib库

特点:不用安装,python自带

3.3.1 urllib基础:

1
2
3
4
5
6
7
8
9
10
11
12
13
14
15
16
17
# 将网页保存到本地,参数为抓取的网址和保存网页的文件路径
urllib.request.urlretrieve(url,file)

# 将urlretrieve产生的缓存清除
urllib.request.urlcleanup()

# 爬取网页
file=urllib.request.urlopen(url)

# 获取header的信息
file.info()

# 获取爬取网页的状态码(200,403,404等)
file.getcode()

# 获取目前爬取的网址
file.geturl()

3.3.2 urllib 库超时设置

根据 网速对方服务器响应 的快慢设置相应的超时设置

1
2
3
4
5
6
7
for i in range(0,100):
try:
file=urllib.request.urlopen("http://www.baidu.com",timeout=2)
data=file.read()
print(i,len(data))
except Exception as e:
print("出现异常"+str(e))

3.3.3 自动模拟http请求:

3.3.3.1 get

常用于:搜索关键词,获得搜索界面

1
2
3
4
5
6
7
8
9
10
11
12
13
14
15
16
17
18
19
20
21
22
#get请求

keywd="Python"
url="http://www.baidu.com/s?wd="+keywd #网址构造
print(url)
req=urllib.request.Request(url) #以请求的方式获取,网址
data=urllib.request.urlopen(req).read()

fh=open("C:/Users/admin/Desktop/a.html","wb") #以二进制写入html文件
fh.write(data)
fh.close()

#若搜索关键词为中文
keywd1="亚马逊"
keywd1=urllib.request.quote(keywd1) #利用quote对中文进行编码
url1="http://www.baidu.com/s?wd="+keywd1
req=urllib.request.Request(url1)
data=urllib.request.urlopen(req).read()

fh=open("C:/Users/admin/Desktop/a.html","wb") #二进制
fh.write(data)
fh.close()
3.3.3.2 post

常用于:登录某些网站

1
2
3
4
5
6
7
8
9
10
11
12
13
14
15
#post请求
import urllib.request
import urllib.parse

url="https://www.iqianyue.com/mypost/" #地址
login=urllib.parse.urlencode(
{"name":"1121640425@qq.com","pass":"123"}
).encode("utf-8") #登录数据
req=urllib.request.Request(url,login)

data=urllib.request.urlopen(req).read()

fh=open("C:/Users/admin/Desktop/a.html","wb")
fh.write(data)
fh.close()

3.4 bs4

来自:https://blog.csdn.net/qq_35490191/article/details/80598620
来源博客

功能: 解析、遍历、维护标签树。

例如:<p class='title'>...</p>

  • 标签名 p
  • 属性名称 class
  • 属性值 title

    3.4.1 bs4 的解析器对比

    在这里插入图片描述

具体用法: soup=BeautifulSoup(markup,from_encoding="编码方式")

1
2
3
4
5
6
7
8
9
10
11
12
13
14
15
16
17
html = """
<html><head><title>The Dormouse's story</title></head>
<body>
<p class="title" name="dromouse"><b>The Dormouse's story</b></p>
<p class="story">Once upon a time there were three little sisters; and their names were
<a href="http://example.com/elsie" class="sister" id="link1"><span> Elsie </span></a>,
<a href="http://example.com/lacie" class="sister" id="link2">Lacie</a> and
<a href="http://example.com/tillie" class="sister" id="link3">Tillie</a>;
and they lived at the bottom of a well.</p>
<p class="story">...</p>
</body>
"""
#######################################################################

from bs4 import BeautifulSoup
soup = BeautifulSoup(html, 'lxml')
print(soup.prettify()) #输出清晰的树形结构

Beautifu Soup将复杂的HTML文档转化为树形结构,每个节点都是Python对象

  • Tag:标签;
  • NavigableString:被包裹在tag内的字符串;
  • BeautifulSoup:表示一个文档的全部内容,大部分时候可以看做一个tag对象,支持遍历文档树和搜索文档树的方法;
  • Comment:特殊NavigableString,会以特殊格式输出,比如注释类型。

    3.4.2 bs4 基本用法

    搜索文档树soup.tag.property 按顺序获得第一个标签

在这里插入图片描述

获取所有 ? 标签: soup.find_all( tag ) // 返回1个list

在这里插入图片描述

将tag的子节点列表方式输出 : tag.contents

在这里插入图片描述

  • 对tag的子节点 进行 循环tag.children
  • 对tag的子孙节点 进行 循环tag.descendants

在这里插入图片描述

获取tag(只有一个子节点)下所有的文本内容 : tag.string

在这里插入图片描述

从文档中获取所有的文字内容soup.get_text( )

在这里插入图片描述

3.4.3 bs4 用法 思维导图

在这里插入图片描述

4、正则表达式

【用于提取信息】

在这里插入图片描述

4.1 正则表达式—思维导图

在这里插入图片描述

4.2 常见的原子类型-正则表达式最基本的单位

在这里插入图片描述

4.3 元字符-正则表达式中具有特殊含义的字符

在这里插入图片描述

4.4 模式修正符-在不改变正则表达式的前提下,调整匹配结果

在这里插入图片描述

4.5 贪婪模式和懒惰模式

在这里插入图片描述

4.6 正则表达式函数

在这里插入图片描述

4.7 练习题:

正则表达式-练习题

5、Selenium

文档:Selenium with Python中文翻译文档 — Selenium-Python中文文档)

5.1、下载、配置浏览器驱动

注意:浏览器版本号要与驱动版本对应。

(1)下载:

谷歌驱动下载网站:chromedriver.storage.googleapis.com/index.html

火狐:Directory Listing: /pub/firefox/releases/ (mozilla.org)

(2)配置

将浏览器驱动解压后放入Python的安装目录(根目录)下。

(3)安装Selenium

1
pip install selenium

5.2、第一个Selenium示例

1
2
3
4
5
6
7
8
9
10
11
12
13
14
15
16
17
18
19
20
21
22
23
24
25
26
27
28
29
30
31
32
33
# 导入Chrome浏览器的驱动
from selenium import webdriver

# 导入键盘按键类
from selenium.webdriver.common.keys import Keys

# 创建一个驱动对象,若没有将驱动放入python的安装目录,则需要在该构造器的参数中传入驱动的位置
broswer = webdriver.Chrome()

# 打开网站
broswer.get("http://www.python.org")

# 打印所请求的页面的代码
print(broswer.page_source)

# WebDriver 提供了大量的方法让你去查询页面中的元素,这些方法形如: find_element,find_elements
# 找到 ID 属性值为 'kw' 的元素(此处找到的是input元素)
elem = broswer.find_element(By.ID,value='kw')
#elem = broswer.find_element(By.Name,value='kw')
#elem = broswer.find_element(By.XPATH,value='//input[@id="kw"]')

# 清除输入框的内容
elem.clear()

# 输入内容
elem.send_keys("显卡")

# 按下回车
elem.send_keys(Keys.RETURN)

# 关闭驱动
broswer.close()

5.3、元素查找

driver 的查找方法:从4.0版本开始需要导入By类指定查找方式,常见的By类的查找方式:

1
2
3
4
5
6
7
8
9
class By:
ID = "id"
XPATH = "xpath"
LINK_TEXT = "link text"
PARTIAL_LINK_TEXT = "partial link text"
NAME = "name"
TAG_NAME = "tag name"
CLASS_NAME = "class name"
CSS_SELECTOR = "css selector"

实例:

1
2
3
4
5
6
from selenium import webdriver
from selenium.webdriver.common.keys import Keys
from selenium.webdriver.common.by import By

broswer = webdriver.Chrome()
elem = broswer.find_element(By.ID,'kw')

5.4、元素信息

elem.get_attribute('属性名')

1
2
3
4
5
6
7
8
9
10
11
12
13
14
15
16
17
18
19
20
from selenium import webdriver
from selenium.webdriver.common.keys import Keys
from selenium.webdriver.common.by import By

browser = webdriver.Chrome()
url = "https://www.baidu.com/"
browser.get(url)

elem = browser.find_element(By.XPATH,value='//input[@id="kw"]')

# 获取标签的属性值
elem_class = elem.get_attribute('class')

# 打印标签的class属性的值
print(elem_class)

elem.clear()
elem.send_keys("显卡")
elem.send_keys(Keys.RETURN)
# browser.close()

5.5、交互案例

需求:打开百度,输入周杰伦,点击搜索按钮,滚动到底部,点击下一页。

1
2
3
4
5
6
7
8
9
10
11
12
13
14
15
16
17
18
19
from selenium import webdriver
from selenium.webdriver.common.keys import Keys
from selenium.webdriver.common.by import By

path='./webdriver.exe'
browser = webdriver.Chrome(path)
url="https://www.baidu.com"
browser.get(url)

elem_input = browser.find_element(By.ID,value="kw")

elem_input.clear()
elem_input.send_keys("周杰伦")

elem_btn = browser.find_element(By.CLASS_NAME,value='btn self-btn bg s_btn')
elem_btn.click()


5.6、Chrome Handleless

由于原生的Selenium需要打开浏览器,使用界面,所以速度较慢,因此可以使用Handleless来进行无界面的操作。

案例:

1
2
3
4
5
6
7
8
9
10
11
12
13
14
15
16
17
18
19
20
21
22
23
24
25
26
27
28
from selenium import webdriver
from selenium.webdriver.common.keys import Keys
from selenium.webdriver.common.by import By
from selenium.webdriver.chrome.options import Options

options = Options()
options.add_argument('--headless')
options.add_argument('--disable-gpu')
# 谷歌浏览器的安装位置
options.binary_location = r'C:\Users\cyw\AppData\Local\Google\Chrome\Application\chrome.exe'

browser = webdriver.Chrome(options=options)


url="https://www.baidu.com"
browser.get(url)

elem_input = browser.find_element(By.ID,value="kw")

elem_input.clear()
elem_input.send_keys("张三")

elem_btn = browser.find_element(By.ID,value='su')
elem_btn.click()

# 截图(保存在项目的根目录下)
browser.save_screenshot("./abc.png")
# browser.close()

封装成函数:

1
2
3
4
5
6
7
8
9
10
11
from selenium import webdriver
from selenium.webdriver.chrome.options import Options

def initChrome():
options = Options()
options.add_argument('--headless')
options.add_argument('--disable-gpu')
# 修改为自己的Chrome浏览器的安装目录
options.binary_location = r'C:\Users\cyw\AppData\Local\Google\Chrome\Application\chrome.exe'
browser = webdriver.Chrome(options=options)
return browser

6. Scrapy 爬虫(网站级)

7、实例

1、二维码生成

1
2
3
4
5
6
7
8
9
10
11
12
13
from MyQR import myqr

def createmyqr():
myqr.run(words="http://cder123.gitee.io/",
picture='C:\\Users\\y\\Desktop\\1.gif',
colorized=True,
save_name="demo.gif")


if __name__ == '__main__':
createmyqr()
print("完成")

2、姓名生成

1
2
3
4
5
6
7
8
9
10
11
12
13
14
15
16
17
18
19
20
21
22
23
24
25
26
27
28
29
30
31
32
33
34
35
36
37
38
39
40
41
42
43
44
45
46
47
48
49
50
51
52
53
54
55
56
57
from random import randint


firstName = [
'赵','钱','孙','李','周','吴','郑','王','冯','陈','褚','卫','蒋','沈','韩','杨',
'朱','秦','尤','许','何','吕','施','张','滕','殷','罗','毕','郝','邬','安','常'
]

lastName_m=['健','瀚','明','楷','玮','桦','冠','辉','杰','洋',
'梓','铭','萧','涵','昊','楷','涛','琪','苑','羽'
]

lastName_f=['羽','莹','梅','秋','谷','梦','芊','琴','菡','曦'
]


def createFullName(sex,count):
resList = []
for i in range(count):
rst = []
rst.append(firstName[randint(0,len(firstName)-1)])
if sex == 'm':
rst.append(lastName_m[randint(0,len(lastName_m)-1)])
elif sex == 'f':
rst.append(lastName_f[randint(0,len(lastName_f)-1)])
else:
print("性别输入错误!")
resList.append(''.join(rst))
print(resList)
return resList


def save(fileName,resList=None):
with open('./'+fileName+'.txt','a+',encoding="utf8") as f:
for i in range(len(resList)):
f.write(resList[i]+",\n")


def randomUserName():
while True:
sex = input(">> 输入性别(m | f):")
count = input(">> 请输入生成次数:")
resList = createFullName(sex,eval(count))
save('001',resList)
isFinish = input(">> 按q退出,任意键继续:")
if isFinish=='q':
break


def main():
randomUserName()

main()